3. Managing Settlement Data
3.1. Reviewing Settlement Records for Microplanning within Region of Interest
This module provides detailed instructions on how to review, add, and update settlement data. In the designated ward, the ward focal person is tasked with assessing the settlement records and names on the MLoS, then cross-referencing this information with GMT. Any settlements on the GMT with inaccuracies in names or locations should be corrected, missing records added, and settlements that are non-existent or not present in the microplan deleted. This should replace the MLoS eventually.
3.1.1. What are Settlements?
When we say “settlement” we refer to a place that health workers identify where they are planning routine immunization activities. Settlements are vector data derived from high-resolution satellite imagery that was used to identify all buildings, which were then aggregated according to specific rules to group them into settlements. See Settlements for more information.
3.1.2. Settlement list
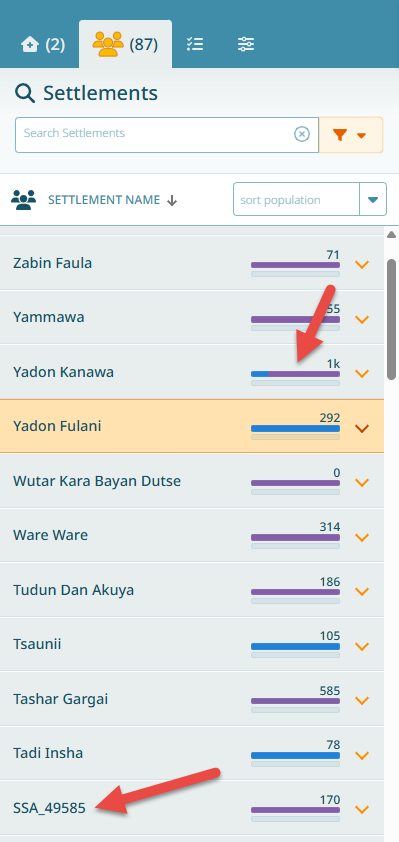
The settlement list is available from the second tab. It lists all settlements in the ward.
Note
If the population estimate bar is completely blue, then the entire population of that settlement is covered by a fixed health facility. If part of the bar is purple, the purple section indicates the proportion of the population that does not fall within the catchment of a health facility. These people are considered unclaimed.
3.1.3. Machine-Generated Names
Settlements extracted from satellite imagery may not always have known names. When no name is available, the system generates automatic names:
HA… - Hamlet Area
SSA… - Small Settlement Area
BUA… - Built-up Area
These machine-generated names should be corrected wherever possible using information from field surveys, local knowledge, or existing maps.
3.1.4. Special Attention
Settlements can be marked as requiring special attention.
Go to the settlement details
Select the Special Attention reasons
When doing so, this results in the following changes:
The population squares for this settlement have changed color, since this settlement requires special attention.
The settlement icon also changed color.
The special attention population bar has changed color.
The reason the settlement is highlighted as having a special requirement is listed.
3.2. Adding and Updating Settlement Records within the Region of Interest
Settlement can be added as new places or new settlement points can be added in areas where there are already existing settlement polygons.
3.2.1. Adding a New Settlement
Use the Create button and select Settlement.
Enter the name and additional details, then click Next.
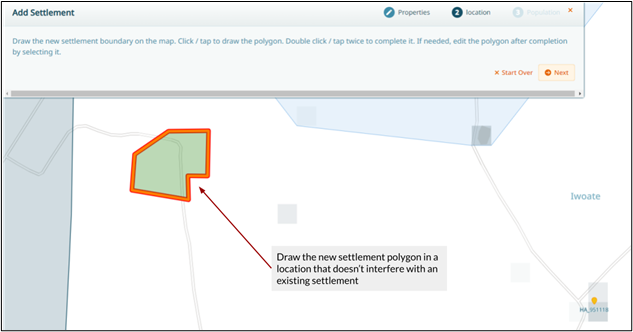
To add a new settlement onto the map, you can either Set Point or Draw Boundary.
Navigate to the place where you want to add the settlement.
Draw a polygon or set the point, depending on what you chose in the step above. Once you are happy with the shape/location of your new settlement, click Next.
Enter the estimated population and click Done
Note
The field “estimated population” is used only in the settlement detail, it does not show elsewhere until the data is exported (see Exporting Data from GMT). To remain consistent, all catchment calculations and population figures in GMT use the modeled population estimates.
3.2.2. Results
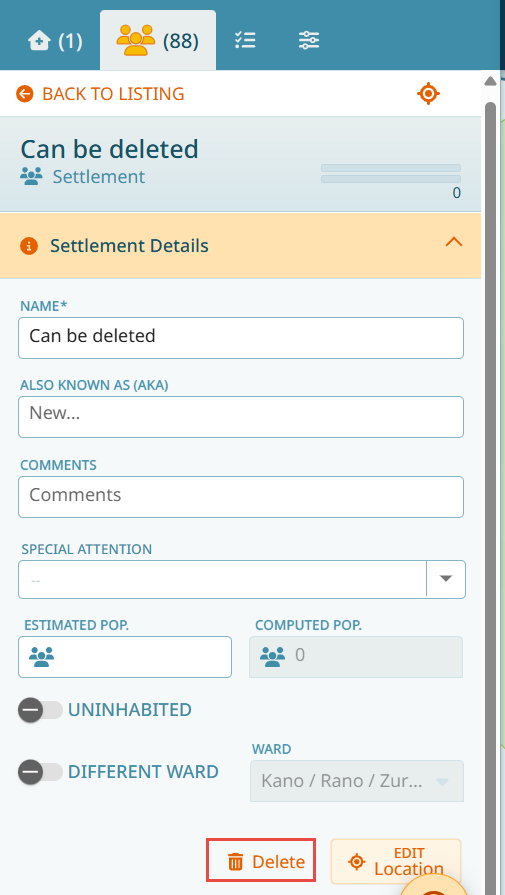
You can now see the new settlement listed in the navigation panel. If there is no modeled estimate for the new settlement, the population is shown as zero (0).
Important
Newly added settlements can be removed via the ‘Delete’ button. However, existing settlements cannot be deleted - they can only be labelled as ‘Uninhabited’ (see Uninhabited Settlements).
3.2.3. Adding Settlement Names Where There is Already a Settlement
In some cases, you may want to add a settlement name to an area that already has a settlement polygon.
When you add a settlement with a location where there is already an existing settlement:
Click on the ‘+’ button and select ‘Settlement’
Add the new name (e.g., “Zion”) and set the point close to the desired location
Finish the steps
The settlement point will be added and the system will automatically attribute population by splitting the existing settlement polygon. The distance between settlement points determines how the boundaries are drawn.
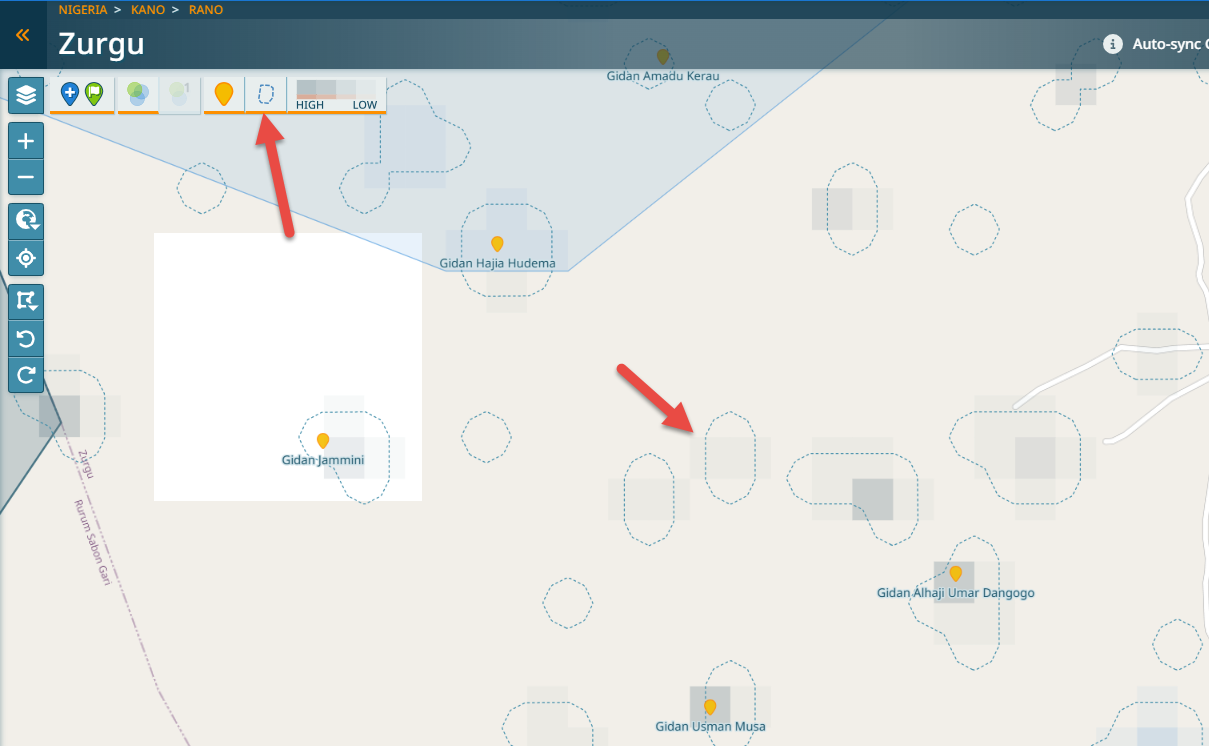
You can visualize how the settlement was split by:
Opening the legend
Deactivating all layers except for the ‘Boundaries’ and ‘Settlements’ sections
Viewing the areas that correspond to each of the names
Caution
The placement of settlement points matters, since it is the distance between settlement points that decides how the settlement boundaries are drawn.
Hint
If you know the exact boundaries of settlements or places and don’t want the system to create boundaries automatically, use the ‘Draw Boundaries’ feature in the wizard to delineate the actual boundary.
3.2.4. Field Data Collection
Settlement names should be corrected wherever possible. If needed, you can use the GPS functionality to go to those places and collect the name directly in the field. Wherever possible, name all settlements.
3.2.5. Uninhabited Settlements
While we can add new settlements, we cannot delete them from GMT - with the exception of GMT added settlements (see Results). This is to prevent the possibility of any communities potentially being missed off the GMT geodatabase. However, if a settlement is generated in a place where there are no people/buildings, or a settlement has been abandoned, we can mark the settlement as Uninhabited.
Consider using the satellite basemap to see if there are buildings present whenever you are uncertain about an area. Best is to be at the site to verify the information.
Click on Go To Details and select Uninhabited
Select the reason why the settlement has been marked as uninhabited (you can choose “abandoned,” “destroyed,” “no settlement” or “Other”, the latter will require a reason).
3.2.6. Results of Marking Uninhabited
The settlement list decreases by one.
The population squares in this settlement turn grey.
The name is in italics.
Any catchments that included this settlement will be recalculated to exclude the population that was previously attributed to this settlement.
Hint
There might be areas where the extraction from satellite imagery has identified settlements where there are none. This is why under the uninhabited choices there is ‘No settlement’.
3.2.7. Assigning a Settlement to a Different Ward
It’s possible that certain existing settlements may actually lie outside your region of interest. To rectify this follow the steps below.
Access the Settlement Tab to view the list of settlements.
Locate and click on the settlement name within your ward that has the incorrect ward name and go to the settlement details.
Click on Different Ward.
In the drop down, select the correct ward name to which the settlement belongs.
You will notice that the total count of settlements in the navigation tab decreases, and the settlement is now included within the ward you have it assigned to.
Important
Whenever doing a change like this, beware that you should in this case also correct the ward boundary! See Boundary Correction.
3.3. Splitting Settlements
Settlements are generated in GMT by grouping building footprint data that are generated from the gridded population data (for more information, refer to Settlements). Sometimes, these aggregation methods may result in settlements being displayed incorrectly in the GMT.
By switching on the settlement boundary in the Map Layer panel, you can see the settlement outlines. By clicking on the map canvas, you can find out which of these polygons belongs to which settlement.
3.3.1. Splitting Process
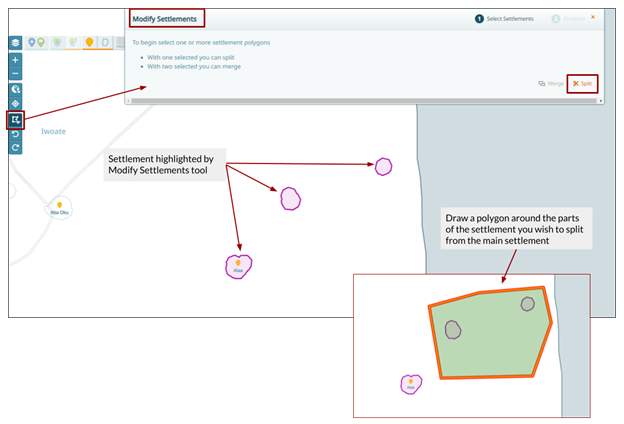
Click the Ward Correction and Modify Settlements tool on the map layer toolbar
Select Modify Settlements
Select the settlement you wish to modify and click Split
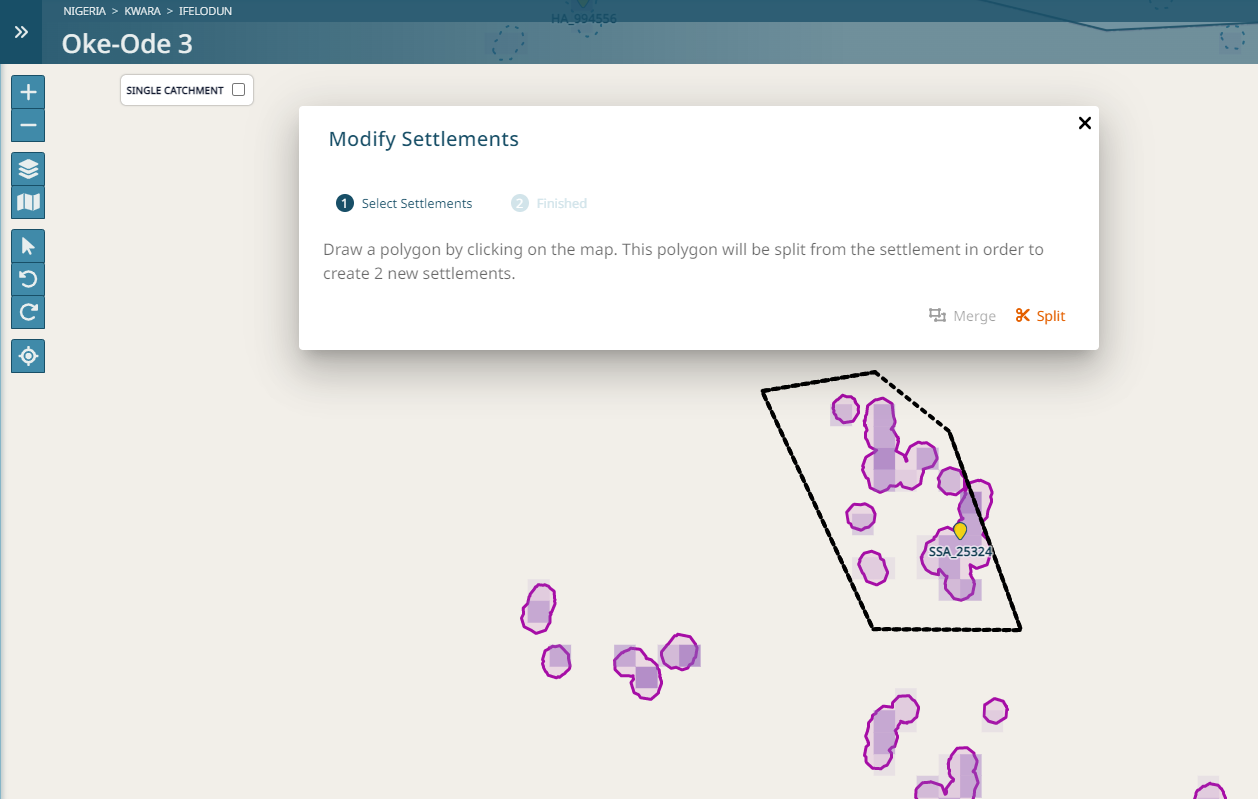
Draw a polygon around the section you wish to separate from the main settlement and click Next
Name the new settlement and click Split
Click Finish to confirm the settlement split
You will now see the new settlement on the map canvas. Additionally, the total settlement count on the top of the settlement tab in the navigation panel will have increased by one.
3.3.2. Splitting Guidelines
When splitting settlements, be careful to:
Include the full shape of the area you want to separate
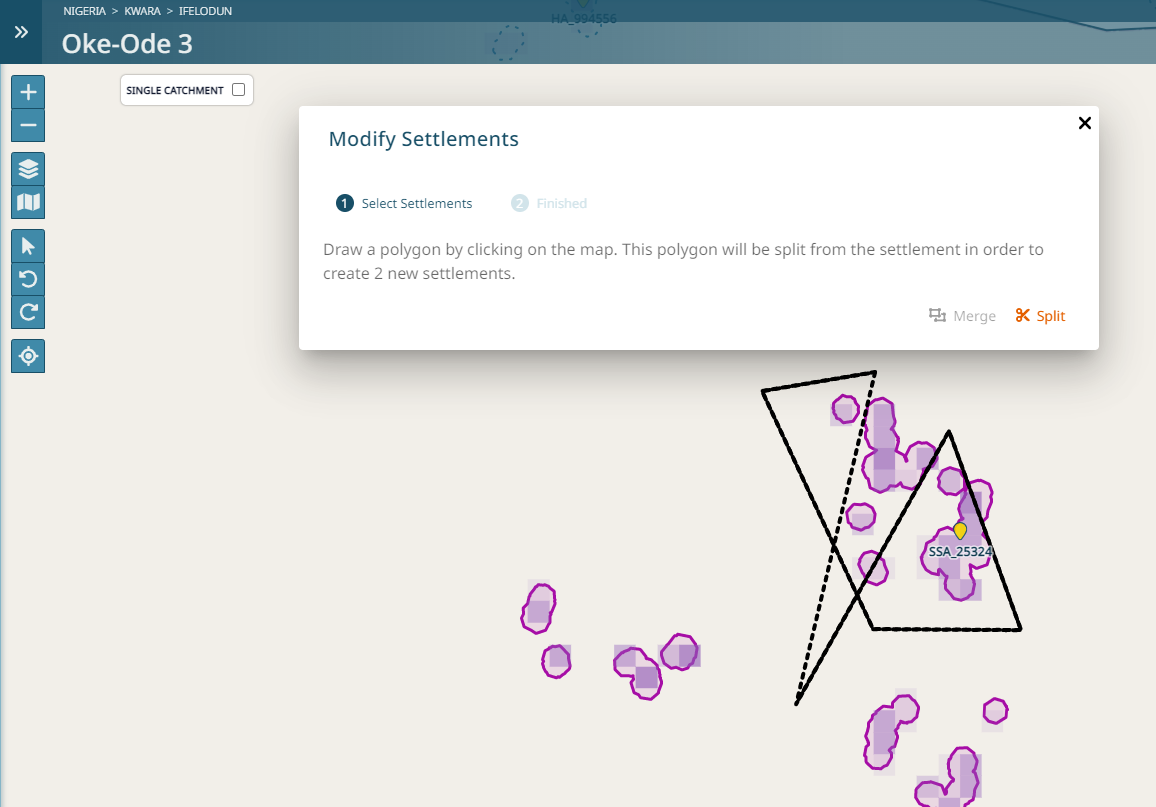
Avoid creating intersections between settlement boundaries
Ensure clear delineation between the split areas
Not like this - include the full shape:
Not like that - avoid intersections:
3.4. Merging Settlements
Settlements are generated in GMT by grouping building footprint data that are generated from the gridded population data (for more information, refer to Settlements). Sometimes, these aggregation methods may result in settlements being displayed incorrectly in the GMT.
3.4.1. Merging Process
Click on the Ward Correction and Modify Settlements tool on the map layer toolbar.
Select Modify Settlements.
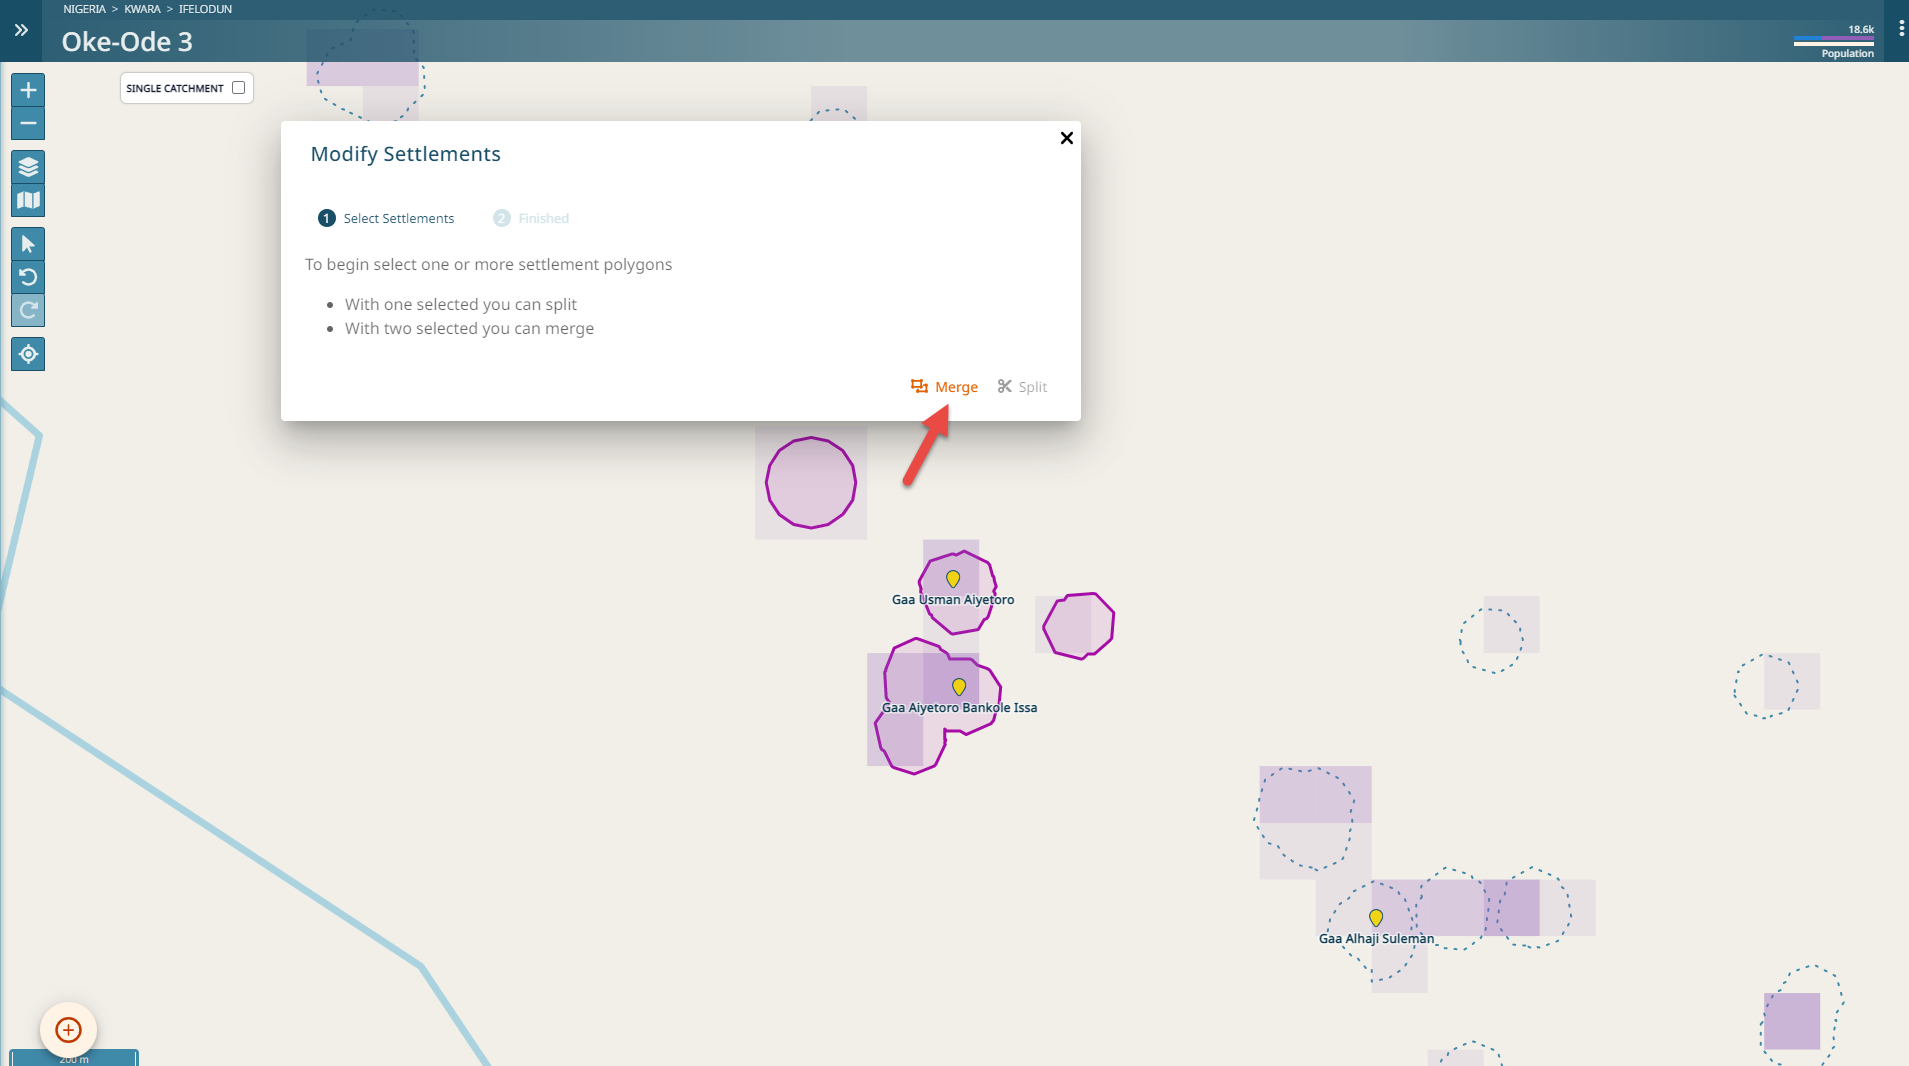
Select the two or more settlements you wish to merge.
Click on ‘Merge’.
Choose which of the names apply for the merged settlement.
Click Finish to confirm the merge.
Hint
If one of the names that you are merging is a machine generated name, the merged name will automatically be a real name as long as there is one.